
Anyone who has ever faced the challenge of taking product photos knows how difficult it can be to capture the perfect lighting for a photo. It's a constant battle over too much light, too little light, light from the wrong direction, light that makes our pictures look yellow or blue, or light that washes out color. Sometimes light can be our best friend and other times it's our worst enemy. My aim with this post is to keep you from tearing your hair out with what I hope are useful lighting tips.
As I discussed last month, natural lighting is usually the best lighting for your products. You can achieve this by setting up your photography “studio” near a windowsill or wherever you have the most natural light in your home. Also consider taking your photos outdoors especially if you don’t have windows where you live. If you are in a low light area be sure to avoid using the flash on your camera. A flash will actually wash out the color and details of your product.
Although natural light is best, direct sunlight found on bright, sunny days can negatively impact your photos as much as low light. Consider taking your outdoor photos on bright yet overcast days to diffuse the light. Afternoons and mornings, when the sun is not directly overhead, are often best. If shooting indoors, you can use a piece of sheer fabric or tracing paper over the window to diffuse light and to create softer highlights and shadows. You can also hang this piece of fabric on a clothes line between the sun and your product when shooting outdoors.
Ultimately, you want your lighting to be soft. So, how do you determine if your lighting is hard or soft? Table Top Studio offers an easy way to determine whether you are dealing with soft or hard lighting.
“Hold your left hand out, keep it flat and slightly in front of you. Now hold a finger from your right hand a few inches above your left hand. Take a look at the shadow cast by your finger. A hard shadow indicates you have hard light conditions, a soft shadow means that the lighting is soft.”

Direct sunlight produces a hard shadow

Soft light inside a light tent produces a soft shadow
Another way to soften shadows is to create your own photographic reflector using a piece of white poster board or foil wrapped cardboard. Let the light fall on your reflector then tilt it towards the unlit side of your product. A white card can also help you achieve this soft lighting effect.
If you are photographing items such as gemstones, metal, or glass, try lighting them from behind. To prevent the reflection of light from obstructing the view of your framed artwork or prints, remove the glass from the frame before photographing. You can also try shooting from an angle either slightly below or beside the object when photographing reflective surfaces.
Lightboxes and Light tents
Depending on who you ask, you'll encounter people who love lightboxes and those that hate them. If you live in an environment where you constantly battle low light situations, or you are unable to photograph outside, a lightbox or tent may be the very solution you have been searching for. However, some of you may find them cumbersome to set up particularly if you do not have a permanent photography nook in your home. Others find their size limiting for their products, and still others find it difficult to get their desired shots working solely with artificial light.
Everybody loves peeking into another person's home to see how they do things, right? Well, I'm going to let you take a peek at my very lavish product photography setup. Okay, it's not lavish by any stretch of the imagination, because I believe in getting by as inexpensively as possible. So here is my easy to assemble and easy to take down, inexpensive lighting solution.
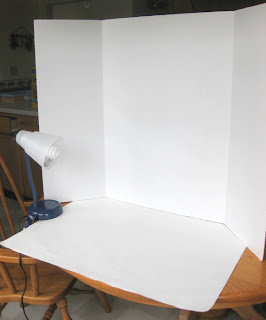
This is the setup that I initially used when I switched to using a white background. It consists of a tri-fold display board and a piece of white poster board all found at a local discount store. I purchased the lamp for $10 during a back-to-school sale last year. The light bulb cost me $6. So, I created a product photo setup for under $20. The best part about this setup is that I can easily fold up the board and place my backdrop on a shelf until it is needed. I take my pictures in front of three standard sized windows directly in front of my setup. I've also achieved desirable results by placing my setup at an angle to the windows so that natural light pours in from one side. On particularly overcast days, I borrow my daughter's desk lamp and place it directly across from the other lamp so that there are two artificial light sources. That way I can eliminate harsh shadows created by a single artificial light source. I usually set my lamps so that they cast light at a 45 degree angle to my product. This also helps to eliminate unwanted shadows.
The one thing that I disliked about the above set up was the crease created between the two boards. So, I started curving the poster board to create a seamless background. Now there are no lines in the background to drive me crazy!


If you chose to use artificial lighting, it is recommended that you use "daylight" compact fluorescent bulbs. Using regular incandescent bulbs can cast yellow light. You want your bulbs to be "full spectrum" bulbs. Ott-lite and n:vision light bulbs are two brands that I often find recommended. Think that more wattage means brighter lights? I was surprised to find out that that's not the case at all! Lumens are what measure brightness and more watts do not always equate to more lumens. Check out this handy lighting chart for more information.
Often light will need to be diffused to prevent harsh shadows or glare. You can achieve this by aiming your lights through translucent white material like tracing paper, tissue paper, or white plastic. Or you can use photographic reflectors as discussed above. An umbrella can be used to diffuse light through it or to bounce light off of it. Aim your light source at a silver or white umbrella to target the light away from your product. Use an umbrella made of sheer material between your light source and product to diffuse the light. Another way to create a soft lighting effect with artificial lighting is to use a softbox.
Here are some other DIY lighting options:
Interested in making your own lightbox or a softbox? Check out these DIY tutorials:
Looking for specific help for the products you sell? Check out these links.
Clothing:
Jewelry:
Artwork:
*Feel free to share your favorite lighting tips and links in the comments below!
This Months Challenge and Goals:
1. Take a look at your shop photos and make note of any pictures that are dark, washed out, over exposed or showing any other lighting improvement needs.
2. Begin experimenting with different lighting setups using either natural or artificial light. Decide which locations and times of day and setups produce the best lighting for your products.
3. Experiment with using lighting reflectors, lightboxes and softboxes if these interest you.
4. If using artificial light, seek out the the best bulbs for your products.
And finally, start looking for your camera's manual. If you've lost your manual, most camera manuals can be found online. If you are ambitious you can start thumbing through the manual now because next month we are going to figure out how to use our camera to its fullest potential.
*To enter this month’s challenge, post a before and after picture of one of your current shop listings in need of a LIGHTING makeover on our Facebook page. Be sure to post the listing URL in the comment box under the posted pictures. You can read more about how to post pictures on Facebook here. If you don’t have a Facebook account, please email your before and after pictures along with a link to the listing in your shop to twolittlebluebirds.etsy.com@gmail.com with “Lighting Makeover” in the subject line.
This month’s challenge winner will be chosen based on most improved in the area of photography lighting. The winning photo, including a link to the winner’s shop, will be featured in next month’s post. The winner will also have their new and improved listing featured in an Etsy mini on the EKTT blog!
*You may enter as many lighting makeover photos as you like for this month's challenge.
**The DEADLINE for photo submissions on Facebook or via email is April 15th.**
And now for the WINNER of the BACKGROUND MAKEOVER CHALLENGE!
May I have a drumroll please.......
Congratulations to Holly of A&B Shoppe on Etsy!
Take a look at the fantastic improvements A&B Shoppe made!

Holly admits that she took this original picture of her wet bag late at night on her wooden floor.

But now that wooden floor background is a thing of the past! Check out this fabulous transformation! Now this bag screams "Look at me! I'm Etsy-fabulous!"
She chose a clutter free, solid colored background that really makes this lovely wet bag POP! Want to see more? Check out this functional and stylish wet bag HERE. There's no doubt that Holly has been working hard to improve many of her shop photos by following the tips and tricks that I presented in last month's post. Watch out A&B Shoppe! Holly's going to make you rock!
Holly has an adorable shop that includes a mixture of function and fun. You can "go green" with her reusable tote bags, or dry your little one off in style with one of her cozy hooded bath towels. Looking for something fun for your little ones? Check out her bean bags sets and cute pocket dolls!
And finally, I want to say that choosing the winner for the background makeover challenge was very difficult. We had so many fantastic entries. Everyone who entered the contest should be so proud of their hard work! I know I'm very proud of, and super impressed by the fabulous changes you've all made! Keep up the good work!
**Miss an installment in the EtsyKids Photo Makeover Series? Click HERE for the entire series.
Yippee!
ReplyDeleteThank you so much for your comments including advice, praise, encouragement, and recognition! I've been so excited working with the EtsyKids Photo Makeover Series. I am excited to continue working through the series. I have a lot of ideas and plans to come. Thank you for this honor: it is somehow both thrilling and kind of embarrassing! Oh well, I'm learning from my mistakes and hoping others will, too. :)
Thanks for the info. Lighting is definitely what I need help with. I'm going to try some of these tips.
ReplyDeleteGreat job on the background change Holly! I love the way your after pic was staged!
Congrats A&B Shoppe...nice work!
ReplyDeleteWow! Congrats the bag looks like a completely different bag! Lighting has always been my problem. I actually bought a light box studio and I still don't get the lighting that I want. I have been shooting outside in my balcony in the mornings and I have been getting the best results. This was a really great article! Thank you
ReplyDeleteI'm so glad that you found the article helpful, Erin and Ana! I think lighting is one of the biggest struggles most of us face when trying to get great product photos. I certainly know that it is for me! I definitely prefer natural light, but capturing the perfect lighting conditions is a challenge right now in gloomy Ohio. I can't wait until summer!
ReplyDeleteYou've inspired me to retake some photos. I'm going to get a trifold board and give it another go! Thanks so much for all of the tips.
ReplyDeleteThis was a great article. I learned a lot of new things that will help me with my photos. Thanks for all this information, Barbara
ReplyDelete