Showing posts with label Etsy product photography. Show all posts

Monday, May 23, 2011

Photo Makeover Series Part 4: Photo Editing, Props, Styling and More!

Photo Editing:
So you've perfected your product photography background and lighting setup. You've read your camera's manual cover to cover--you did read it cover to cover, right? ;) --and you've mastered your camera settings. But, something is still missing....Enter photo editing, the saving grace for anyone who sells online!

Photo editing allows you to crop and resize photos. You can adjust highlights, shadows, contrast, color saturation ,and color temperature. You can retouch photos, straighten them, sharpen them (when they are slightly out of focus), add text including watermarks and logos, and create collages. The digital world is truly amazing!

But, finding a great photo editing system is going to cost you an arm and a leg, right? Not when there are so many fantastic and free editing tools available including Picasa, Picnik, FotoFlexer, Lunapic, Pixlr, FotoFuze, Photoscape, and Gimp. Would you love to use Photoshop, but a paid service isn't in the cards for you? Check out Aviary's Image Editor. Looking for more options? Check out this extensive list of free photo editing services.

Filling the frame through cropping may be a great way to add interest and focus and show off the details of your product, but be careful that you don't crop so closely that a potential buyer is left wondering what your item actually looks like. I've come across some really artistically cropped photos on Etsy, but after looking through all of the photos in their listing I still had a hard time figuring out what they were actually selling! Looking for an easy way to resize your photos into perfectly sized thumbnails? Check out this video tutorial on resizing your photos the easy way from the Etsy Blog.

I do most of my photo editing using Picasa and Picnik. I find them easy to use especially for a person like me who is anything but tech savvy! Picasa now allows you to edit in Picnik too which makes my life even easier!

Want to read more? Check out these helpful articles:

Using Photoshop:

Using Aviary:

Using Gimp:

Using Picnik:

Using Picasa:

Using Props and Adding Style:
Do you ever wonder about using props to enhance your product photos and add style? Are you afraid that your neutral background is too boring? Props can certainly improve the quality of your photos especially if they are used to display your product or they have the effect of enhancing your product. Are you trying to show size and dimension? Then try photographing your product with other common items to help give it context and scale. Dimensions included in the product description or a photo of your product next to a ruler won't give every shopper a clear sense of the size and proportions of your product. Visual aids, in the form of props, on the other hand can speak volumes. Props can be used to demonstrate how your product can be used or how it can fit into a potential buyers home or life. Check out how this photographer effectively uses props to showcase a designer's handbags.

The downside of any prop is that it can become distracting. The last thing you want is to have potential buyers busy looking at your props and forgetting about the actual item you are selling! So, make sure that your props compliment your products rather than steal the spotlight. If you choose to use props be consistent with your theme. Consistency leads to a more cohesive and inviting look for your shop and it helps shoppers recognize your products. Remember that you don't have to use props for all five of your product shots on Etsy. Adding style and flair to just your first photo will serve to intrigue potential buyers and lead to more treasury features.

Another way to add style is the use of unique angles. You can shoot from above, below, at the same level, or off center so only a portion of your product shows. Use these shots to highlight a particular feature or detail of your product. You can also crop more conventional shots afterwards if you don't feel comfortable experimenting with new angles. When taking angled shots of your product on a model, do be mindful of the background. If an angled shot means that you are now showing the mud puddle your son is standing in or your living room floor then you may want to skip the angles and instead get down to the level of your model. Also remember over using unique angles and close-ups can make it hard for shoppers to determine proportions, dimensions, and the overall look of your product. If buyers can't tell what you are selling in your beautifully artistic photos, then you will have defeated the purpose of adding style in the first place!

Here's an example of a picture I took using both props and angles to add interest to this photograph of felt cookies.

Learning to style and enhace your photos not only helps you showcase your products, but it helps you tell a story about your creations. Styling your photos can help you create a mood and an atmosphere for your product. Check out these online articles on styling your product photos:


Using Models and Mannequins:
I think that most people will agree that they prefer to see wearable items modeled. I know when I'm shopping for jewelry on Etsy that I am more likely to buy an item if at least one of the product photos shows the item worn by a model. So, do you use a live model or a mannequin? Many people don't have willing or appropriate models in their homes. Modeling your cute hair accessories on your five year-old son probably isn't going to run your sales through the roof! However, if you have willing models (children, grandchildren, cousins, nieces, nephews, friends, neighbors) then by all means use them, especially if they are free! Mannequins and dress forms can be successfully used in place of a live model. Check out this article on Models vs. Mannequins for some great tips.

In researching this post, I was surprised when I came across some sellers on Etsy who offer product photography services using a live model. Maybe I've had my head in the sand on this one, but just in case I beat you to the punch, here are some sellers on Etsy offering product photography on live models. *Please keep in mind that I am not endorsing any of these sellers and I have no affiliation with them. They are simply sellers I came across when searching for "product photography models".


Another option is a modeling service that connects product models with sellers. Most of these are "free" services in which you pick a model from an agency and send that model the item you want photographed. The product is professionally photographed and you are sent pictures of your product on your chosen model. The model then keeps the item you made for the photo shoot as "payment".
It probably goes without saying, but I do recommend that you carefully research any modeling service that you are considering to insure that they are a reputable business and that you will receive quality product photos in exchange for your money or handmade products.

Composition:
Another way to style your photos is through photography composition. If you want to know more about composition you'll need to take a moment to understand the Rule of Thirds and Dynamic Diagonals. This Composition in Photography article explains both quite well. It's definitely worth reading.

Most of all don't be afraid to take TONS of pictures when you are photographing your products. The beauty of digital cameras is that you won't waste any film, and you never know when you will capture the perfect product photo!

What to read more? Check out these articles:

And if you are a visual person you will want to check out:

The Photo Makeover Final Challenge:
We are looking for your very best product photos. This is your chance to show off all that you have learned throughout this series. Show us your fabulous backgrounds, lighting, photo editing, style, composition, and camera knowledge. Stop at nothing to reveal your very best shots! We want to see them all! Post a before and after picture of one (or more) of your current shop listings that you've turned into a fantastic photo on our Facebook page. Be sure to post the listing URL in the comment box under the posted pictures. You can read more about how to post pictures on Facebook here. If you don’t have a Facebook account, please email your before and after pictures along with a link to the listing in your shop to twolittlebluebirds.etsy.com@gmail.com with “Final Challenge” in the subject line.

Enter as many photos as you like into this contest. You can also re-enter any photo that you previously submitted for any of the other challenges in this series. Three winners will be chosen and the winning photos, including a link to the winner’s shop, will be featured in our very last EtsyKids Photo Makeover Series post on June 27th. The winners will also have their new and improved listing featured in an Etsy mini on the EKTT blog!

The Deadline for the Final Challenge is June 24th

**Miss an installment in the EtsyKids Photo Makeover Series? Click HERE for the entire series.




Monday, April 18, 2011

Photo Makeover Series Part 3: Camera Settings

So you’ve figured out ways to improve your product photography backgrounds and lighting, but this series would be woefully incomplete if we didn’t tackle one very important topic. Yes, it’s time to dig out your camera’s manual and yes, you must read it. I know what could be more boring, right? But, you would be amazed at what you can find in there that can have a dramatic impact on the quality of your photos. Here are some of the most important settings that you will want to take a look at and experiment with.


Flash Off: Before taking any pictures, make sure that you disable your camera's built-in flash. This is usually indicated with a lightning bolt with a slash through it.


Macro Setting: This setting allows your camera to focus very close to an object. This feature is important if you are photographing small objects like jewelry, or you are trying to capture special detail in your item. This setting is usually indicated by a tulip for most cameras.


Exposure Compensation (Exposure Value): Cameras have a tendency to underexpose images when you are using a white or very light background. Adjusting your camera’s exposure compensation allows you to avoid these dark underexposed photos. Exposure values are numeric values (+1, +2, -1, -2). The no-compensation setting is set at zero. Raising or lowering the exposure value from zero allows you to adjust the shutter speed and lens aperture which allows either more or less light to reach your camera. The result is either brighter or darker photographs. Look for a “+/- 0” icon. Selecting this icon allows you to move up or down a scale. Look in your camera’s monitor and you will see your shot become brighter as you move to the right (up the scale) and darker as you move left (down the scale). Check out this fabulous interactive demonstration of exposure compensation at TableTopStudio. Just drag your computer's cursor over the EV= -2 to EV= +2 to see exactly how exposure compensation can make a difference for your photos.

Tip: As you raise the exposure value to brighten a shot, the camera will take longer to gather light and take the photo. This can exacerbate "camera shake". You can compensate for this by using a tripod and by pressing the shutter button cleanly and gently, or take advantage of your camera's timer function.


White Balance: Battling yellow or blue tinged photos? Then you will want to learn how to adjust your camera's white balance. Nearly every digital camera has an automatic white balance feature (AWB-auto white balance) that adjusts colors depending on the lighting conditions. This automatic setting works great for normal snapshots, but for product photography, you will want to learn how use your camera's preset white balance settings to match the type of light you are using (daylight, cloudy, tungsten, fluorescent, etc.). The icon for the white balance function usually looks like a little lightbulb. Take some time to try out each setting to determine which one looks best with the lighting and background you are using. The end result will be product photos with truer, brighter colors. Many basic digital cameras also allow you to customize the white balance. When using a white background with artificial or natural light I prefer to use the "daylight" setting.


Tip: For maximum results allow your EV and white balance settings to work together. If you raise your exposure compensation to brighten a photo, but fail to adjust the white balance, you will end up with a brighter photo that still has a blue or orange tint. And if you adjust the white balance to match your lighting conditions, but fail to adjust your exposure compensation to make up for low lighting, you may find that you are left with a dark photo with true colors. Set your white balance first and then fine tune your exposure compensation until you find the perfect combination!


ISO: On your digital camera, ISO refers to the film speed. Although your digital camera doesn't use film, ISO determines how sensitive the image sensor is to light. The most common ISO settings are 100, 200, 400, and 800. The higher the ISO setting the more grainy the photo will be. So, opt for a low ISO whenever possible. One source I came across recommended using an ISO setting of 50 or 100 for the best quality photos. Keep in mind that a low ISO means that your camera's sensitivity to light is reduced so a photography setup with good lighting is important.


Aperture: If your camera allows, try adjusting the aperture (often referred to as the f-stop or f-number). Experiment with putting your camera in Aperture-Priority Mode (Av mode) with the aperture set to the highest number possible. This will allow you to get the largest area of your product in focus. Are you trying to emphasize the foreground while you blur out the background? Then try using a small aperture setting to provide more depth of field, or if you have a digital camera that doesn't allow for adjustments in aperture, use the portrait setting (picture of a head) for shallow depth of field and use the landscape (picture of a mountain) setting to achieve a wide depth of field.


Browsing through your camera's manual may put you in touch with many more settings not addressed here. Take the time to experiment with them to see how they affect the quality of your photos. You may be very pleasantly surprised! If you have a digital SLR camera you will find that you have many more options and more control over your camera settings than you will with a typical point and shoot camera. However, don't despair! Even if a camera upgrade isn't in the budget this year (or any year!) you can make very noticeable photo improvements even with a basic digital camera. I've experimented with ISO settings and shutter speeds with really no noticeable improvement, and unfortunately my camera does not have an Aperture-Priority Mode, but I've found that adjusting both the exposure compensation and white balance make a huge difference! Check out this example:


This picture was taken using my camera's preprogrammed Auto Setting. No adjustments were made other than to turn on my camera's Macro Setting. I used my typical background setup, but because it was such a gloomy day, I had to rely on artificial lighting (with two lamps). Even with the extra lighting my picture still turned out dark.

This picture was taken with my camera on Manual Setting. In this setting, I am able to make adjustments to the white balance and exposure compensation. I set my white balance to Daylight, and I adjusted the exposure compensation to +1 to create a whiter background and a brighter overall picture.


Just like anything in life, it takes time to learn new skills, but I'm confident that if you make a commitment to learn something new about your camera each month you will soon discover the perfect combination of background, lighting, and camera settings that will make your products shine!


Want to read more? Check out these articles:

1. Perfect Colors Every Time (How to adjust white balance using a gray card)

2. What is ISO Setting on Your Digital SLR (DSLR) Camera and How Do You Use It?

3. Bright Light, Big Color: Using EV and White Balance to Make Your Photos True to Life

4. 9 Digital Camera Settings for Every Photographer to Discover

5. Photography with Jessica: Aperture


Looking for a new camera? Check out these helpful articles:

1. What is the Best Digital Camera to Buy for Product Photography?

2. Etsy Success: The Right Camera

3. Features to Look for in a Digital Camera

4. What Type of Digital Camera is Best for You?


This Month's Challenge and Goals:

1. Find your camera's manual. Has your camera manual vaporized along with your favorite socks? No worries! Most camera manuals can be found online. Just search for your camera's make and model.

2. Pick a setting and start experimenting! Then show us all of your new and improved photos by entering this month's challenge.


*To enter this month’s challenge: Choose one of your camera's setting (or as many settings as you like) that you wish to learn how to use. Use your new found camera setting knowledge to improve one of your current shop listings. Post a before and after picture on our Facebook page. In the comment box under your photos, indicate what settings you experimented with to make the improvements in your after picture. Be specific about what settings you changed and how they improved the overall quality of your after photo.


Be sure to also post the listing URL in the comment box under the posted pictures. You can read more about how to post pictures on Facebook here. If you don’t have a Facebook account, please email your before and after pictures along with a link to the listing in your shop to twolittlebluebirds.etsy.com@gmail.com with “Camera Settings” in the subject line.


This month’s challenge winner will be chosen based on most improved photo due to camera setting changes. The winning photo, including a link to the winner’s shop, will be featured in next month’s post. The winner will also have their new and improved listing featured in an Etsy mini on the EKTT blog!


*You may enter as many photo as you like for this month's challenge.

**The DEADLINE for photo submissions on Facebook or via email is May 20th.**

And now for the WINNER of the LIGHTING MAKEOVER CHALLENGE!

Congratulations to Tricia of Sweeter Than Sweets!

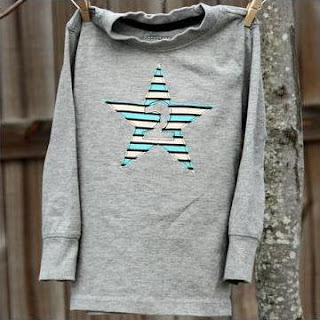
Here is Tricia's winning entry:

In this before shot you see harsh shadows and glare.

But Tricia was up for the challenge and took this fabulously lit photo in natural light. Say good-bye to those harsh shadows and glare! Hello fabulous lighting! Now this cute shirt really is The Star of the Show!

Tricia is another one of our EtsyKids Team members who has been working hard to makeover her shop photos. And the hard work is paying off because Sweeter Than Sweets is looking fabulous! Stop by and see her new improved shop and all of her adorable items including hair accessories, boutique burp cloths, hooded towels, and appliqued clothing. You are sure to find many adorable things for the little sweetheart in your life!

Congratulations Sweeter Than Sweets on a job well done! Keep up the great work!

**Miss an installment in the EtsyKids Photo Makeover Series? Click HERE for the entire series.